Showing posts with label watercolour pencils. Show all posts

Friday, 11 February 2011

HYACINTHS IN THREE MEDIA

My lovely neighbours brought me in a basket of six hyacinth bulbs for my birthday and now a week later they have grown into the most beautiful looking and smelling blooms. So on Thursday I painted them in watercolour when my ladies came round for an afternoon session of painting together.

Here is the watercolour afternoon effort:


Inspired by Penny creating a lovely work in pastel pencils, I created a study in watercolour pencils in my garden flower sketchbook when they left. Then this evening I decided to spend time doing another study in Inktense pencils to see how different they would turn out.

Here is the double spread: (which can be enlarged sepately)

Sunday, 7 March 2010

WATERCOLOUR PENCIL WORKSHOP

Our first workshop of the year took place on Saturday when we worked with watercolour pencils. The morning was taken up with practicing the many diverse methods of using this media from dry contour work, to drawing into wet paper, scrapping pigment from the tip of the pencil, cross hatching, blending, lifting to create highlights, etc. Each member attending selected an object from the many objects I had collected and brought in from a mixed supply of fresh fruit, to small ceramic figures, pots, feathers, jugs, cones and on and on as seen in this photo.


Here is some early work by my regulars showing contour drawing, wetting the pigment after applying to dry paper, wetting tip of pencil for strong marks, lifting out colour and scrapping pigment from the tip of the pencil onto wet paper.


We had four new members to the group and some of their morning practicing work is shown below: The first two images show work by two young teenagers who joined us with undoubted artistic talents wishing to develop their skills.
The strawberries and apples were painted by new members who would normally go through my basic drawing skills before embarking on colour work and under the circumstances very courageously tried these rather complex techniques.
Finally, I am proud to say that one of my teenage regulars is embarking on an illustrative project for a children's storybook and found watercolour pencils really interesting to develop her characters.
The day flew by with our usual breaks for drinks and biscuits (am) and cakes (pm) with everyone really surprised to find how this overlooked cinderella media is so versatile.

Sunday, 13 December 2009

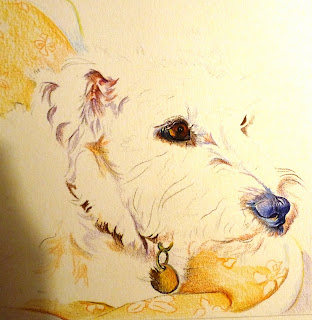
MIXED MEDIA MAX

Close up of Max eye area on finished mixed media artwork to give you an idea of how the varied layers I describe below worked out.
A dear friend who lives in Cromer lost one of her beloved dogs this year and as I knew I had taken photos of them over the past few years, I rummaged through my Iomega stand alone hard drive archives to find a suitable photo to inspire me for a Christmas present painting.

These are the colours I chose for all the pigments showing through Max's fur from pinky/purple skin, to raw sienna and soft grey/blue shadows , the blues/purples in the nose and greens and yellow background.


You will see I have entitled the piece MIXED MEDIA MAX and that is revealing how it emerged


from the initial graphite sketch,


dry watercolour pencils,


then wetting tips of the pencils and adding areas of slightly wet pigment.

This is the final mounted piece I have put into a natural creamy wood square frame.


Seems I did not take photos at some of the more specific stages, particularly as I decided to add Liquitex liquid acrylic white fur marks and when dry go in and redefine the colours. Finally I scrubbed (yes really - brave of me don't you think?) all over with dry white watercolour pencil and in places pink or yellow watercolour pencil and darkened the collar. See sample close up at the top for better detail.
I am sure Anne will recognise her own garden chairs with yellow cushions and climbing plants. Only hopes she thinks it looks like Max and is pleased with the surprise.

Sunday, 8 February 2009

WATERCOLOUR PENCIL WORKSHOP

At our last meeting members asked to have a session with watercolour pencils, so I took along a variety of subjects to inspire creative works and you may remember from a previous post that I practiced various techniques myself with artichokes just to remind myself of their versatility.

In the morning we worked together trying out different techniques with these wonderful tools. We worked with dry pencil, layering to achieve gloss, variety of colours laid dry on each other to create a mix directly on the paper . Then wet our paper before adding colour, wet the tip of the pencil to create strong tones on dry paper or previously dried washes, created tonal washes by dragging out the dry colour with a damp brush. Finally talked about spraying water on already laid down colour with a fine bottle spray and scraped colour off the pencil tip with a scapel to achieve texture over a previous wet layer.
When members felt comfortable with the pencil and waterbrush methods we had tried , they chose a small object to practice these techniques, which I felt worked really well, ie

We had a new member this month, who worked in the morning with geometric shapes using graphite pencils learning about proportions, negative space, relationships, perspective and used for the first time the thumb/pencil method of measuring. We did not have time to explore tone together, but for the afternoon he worked with watercolour paints using some of the fruit I had taken as his subject matter, as although he has worked for a number of years with oils is attending our group to learn more about how to use watercolour.

After a lunch break, a major piece was created from the various objects I set up, ie.

Philippa used a set of graphitint pencils to create the porcelain Chinese/Japanese (?) Fisherman
and Helen used a new set of full colour watercolour pencils she had for Christmas from her son, searching out colour within the dried artichokes.
My only feeling at the end of the day was that I had not steered them away from using too much brush and water with their main piece of artwork of the day. It was almost as if they were trying to create a typical watercolour work from the pencils instead of seeing them as a completely different and versatile media to work with. Naughty tutor.!

Saturday, 24 January 2009

WATERCOLOUR PENCIL ZENTANGLES

Just to give you all a break from my YUPO studies, here's a couple of zentangles I've created in the past week but this time I used watercolour pencil and then in some areas used my waterbrush to smooth the colour to give contrast to the pencil work. Dont know if they can still be called zentangles as they are getting more like 'scenes' .... I think they are worth enlarging to see the detail.

This one looks like three earths floating in the sea.
I think I was influenced by some of the zentangles posted by others where I liked the addition of floaty bits outside the main shape.
Don't know about this one but is it skyscrapers and circus tents in the background?? It began with the organic petal shapes and then drew the dark circle around its centre and moved on from their. My favourite bit is the scroll shape.

Tuesday, 13 January 2009

TODAY ONE WHOLE YEAR A BLOGGER

This is post 125 and 3535 visitors on my counter. Cant believe where the time has gone and what I would have done with my time when sitting here in my lovely comfy study bashing away on the keyboard to communicate with the best bunch of art pals worldwide. I have so appreciated your support, advice and friendship you have all brought to me.

ARTICHOKES WATERCOLOUR PENCIL PRACTICE
In my little study showing my very useful two height drawing desk.
Today I'm going to post a series of watercolour pencil stages of a group of artichokes, as I agreed at the last workshop that watercolour pencils was going to be the new media for our February workshop. .. so I thought I ought to remind myself of their versatility. I spied some dried artichokes growing in one of the allotments and had permission to cut them down for sketching.

Dry pencil work and some mixed dry and wet techniques
I hope my sketches show a) how to pencil sketch lightly a simple composition giving various angles of the flowerhead, b) how to add dry watercolour pencil marks, c) add water with a brush to some areas leaving others dry and finally d) how to use strong linear marks created by wetting the tip of the pencil.
Thought I'd leave it at this to show the group the various stages.